Showing posts with label Fantasy. Show all posts

Tuesday, December 17, 2013

Archangel Stallone (Kingdom Death Chosen)


Here is my newest! I bought him originally because I thought he looked like Stallone which he doesn't really but I'll keep pretending.
I tried something new on this guy for his wings I actually used gold leaf instead of paint.  Now I can't say that it was worth it but it was a fun experiment. I still had to paint it because it was so flat and bright compared to the rest of the miniature. I will say that gold leaf is a pain in the butt because no matter how well you think you put the glue down for it , it will do what ever the hell it wants. I ended up with a couple of oooops moments but just rolled with them in the end.  Anyways I hope you enjoy him!


Thursday, April 18, 2013

Steampunk Princess Bust Review

So I finally picked up the Steampunk Princess Bust from CMON

I love this sculpt it is amazing!! It is by La Fábrica Roja .
And I remember when I first saw it on facebook I knew I needed to paint it.  I had to wait a while after it came out due to funds but now she is all mine. 
This post is a cry for Valiant casting to slow down and rethink the way they cast up their stuff.   I guess I just think their style of casting is downright sloppy.  I don't encounter any of these problems from any other company who casts in resin ie: SMOG, KD, AMMON, etc..
This is probably the least amount of problems I've had with one of Valiant's resin casts.  It's a beautiful model and I'm going to pain the hell out of it.  So just watch out for the little issues I've pointed out and you should be fine.


So this is where I noticed the huge gap in her neck.  I understand wanting it to be one piece to cut down on mold costs but come on guys at least fill in your gaps and smooth out your glue overflow.

Here she is after I filed the glue blob off her neck and smoothed it out and filled in the gap with green stuff.

Actually this was pretty much all the air bubbles there were which is awesome. But the buckle and strap suffered on her pouch due to an air feed being right on top of it.  So all that detail is gone.  If it was just moved over a tiny bit it could have been avoided.  And of course it suffered from a glob of glue detail which did most of the damage.
Also there was a huge feed in the curve of her shoulder which I had to carve out


First view of her right out of the box. she looks amazing.


Typical Sprue from Valient/CMON I hate them. Those glue blobs and thick balsa wood feeds are horrid. quite often the sculpt gets ruined because they are glued to a curve.  Luckily I have a boyfriend who is a professional sculptor that can re-sculpt any detail that gets destroyed.

Here is an example of how a sculpt get ruined from a huge feed on a small piece.

And again, mostly my fault though If i had been more careful I could have avoided this.  But a less experienced artist might not have the ability to fix it.

A little fill work  which isn't bad at all. It just needs some sanding to make sure it's smooth.

The shoulder did not want to fit and barely touches. Normally I would have painted it separately but due to the huge gap I had to attach and I will have to fill it with green stuff .  Luckily her sleeve covers up the area where the feed ruined the detail on the pouch.


Tuesday, December 18, 2012

Sneak peek of large project

So here is the start of a very large project that will take many moons to complete.   Since i'm finally on my winter vacation (all 7 days of it)  I'm going to start painting one of the figures. I'm not sure which one yet. It may be the dog. ;) 
Missing from the picture is the wall and door between the step and bar. Table, Chairs, Drunk robot and probably a bunch of odds and ends.   This piece is going to be my tribute to Post Apocalyptic movies and there will be a lot of little do-dads from those movies in it.  Got an idea for something you think I should add well now is your chance! Post it in the comments and I may just use it! ;)


Friday, December 14, 2012

Lion Knight 2 & Court by Kingdom Death - Finished

Well he didn't turn out as dark as I had planned and I never truly got a good flow with the court women but over all I'm mildly happy with them. I probably could have spent another 5 hours on their flesh tones just to get it right.  There are still a few shiny spots so it looks like I may need to go over them again with the matte sealer as well as clean up and adjust a few spots here and there.
Anyways enough with kicking myself on this guy I hope you enjoy.  This set is really enjoyable to paint.   
Also if you haven't seen it yet Kingdom Death is running a Kickstarter for his game MONSTER
Please check it out!! 
*edit : updated pictures


Thursday, December 6, 2012

KD - Lion Knight 2 - WIP update

Here is a little update on my Lion Knight.  I've also been working on his women which is why there doesn't seem to be very much done to him since last time.  No picture of them yet as they have a long way to go. Skin tones seem to take forever to paint. I've also put a coat of paint on his base as well (not pictured) So I totally have a plan now! :D
I also still have a long way to go with this guy, I need to add a dark orange glaze to his darker hair and clean up the gold trim on his cape and i'm sure a bunch of other fiddly stuff.  I'm saving his claws for last since they seem to get a lot of contact from my hand when I'm painting and i don't want my hard work to rub off.


Monday, November 19, 2012

WIP Lion Knight 2 - Kingdom Death

Here is a little update on what I'm working on now, the Lion Knight 2 by Kingdom Death. 
 I think today i'm going to start on his face and make him look like a traditional lion although not a bright tan lion but more of a dirty darker fur lion. 
I'm not sure what I'm going to do for a base yet or if I want to use what he came with. I guess I will find out when I reach that point.


Wednesday, November 7, 2012

Siobhana Of Weissburg

Ok kiddies, here is my newest monstrosity. 
This is Siobhana Of Weissburg by Reaper Miniatures. This gal has been around for ages and i'm not even sure how I ended up with this figure.  I think it might have been when a friend bought out a shop of their minis when they were going out of business. 
But she is for the WAMP painting contest as I wanted to get something done with out having to put my heart and soul into it. I chose her because she had her own atmosphere and I wouldn't have to build something myself. (I know it's totally lazy of me) But sometimes you just need something quick and dirty.  It took me a few hours but I finally found a zen with her and got her painted up pretty quickly.   I could probably fiddle around with her for a few more hours but i wanted to get started on my Kingdom Death contest entry since I only have a month and a half to get it finished.  So expect some work in progress posts over the next month.
Anyways I hope you enjoy my little purple vampire. 


Tuesday, October 30, 2012

Shark Man

Ok I promised something "Darker" and I lied.  The only reason this piece is dark is because it was painted during depression.  Other than that I'm pretty sure if this guy was real he would be amazingly stinky. mmmm dead shark cape. 
After the past few pieces I've painted I needed something simple and fun to paint, and I've been waiting over a month to paint this guy. I love sharks and finding this guy as my local shop was pure gold. I wanted to paint him right away but I needed to finish up my contest stuff first.  
In this piece I experimented with simplifying my pallet using black and whites to darken my paints instead of adding another step of color and then black or white. Also the darker/tan skin tone was a good excuse to experiment with using more purple and reds than I normally do.  I could/should have spent more time on his skin tone but I didn't since depression was in charge. I also laughed at the shark rib bones on the figure since shark's skeletons are made of all cartilage except for their jaws and to top it off sharks don't even have ribs..... Oh I actually found a use for dry brushing! (I remember when dry brushing was all the rage) I've shunned it for such a long time I always forget that it works well on wood textures.  Although my dry brushing wasn't as "dry" as the name suggests.  After the dry brushing of multiple layers of color I added a thin wash of a darker brown color to blend the colors together and remove the harshness that dry brushing creates and then started adding in more layers of dark colors to shade the shipwreck.  I wanted to give her a weathered look with out going 'over board'... (har har)

Ron & Bones - Teruk` te, : Wyrd Base insert - Driftwood docks


Tuesday, September 4, 2012

Show us how big brother! - SDE Dragons

Well I finally finished up those Super dungeon explore dragons I started oh so long ago.  I went for something easy, silly and not too involved for this one. It was almost like instant satisfaction since I only had to do a small amount of painting and put them on a base.
Now i'm sure if you own SDE box you will notice my winged dragon is much larger than yours and no it's not available to the public. That is unless someone bugs soda pop enough for them to make it available but I don't see it happening, but I could be wrong. ;)   I should also include that my boyfriend sculpted these little buggers for Soda Pop,  ( Check out his Blog here ) which is why I have different sized dag-rons than everyone else.
Anyways this is my first entry for the Soda pop painting contest I posted about a few days ago. (scroll down for information)  Now I've started on my next one and she will take much longer to paint than this one.   I hope you enjoy these little dag-rons as much as I do. 


Friday, August 31, 2012

Artemis Finished

Despite all the craziness that has been going on in my life I have finally managed to finish Artemis.
Artemis has been hanging around my miniature bin for a while now. Finally WAMP forum decided to run a painting contest and she got pulled out and she was finally graced with paint.

I decided not to go crazy with the paint scheme and to keep it simple. Although I couldn't resist adding a portrait of medusa onto her shield. I've been trying to push myself to take advantage of large empty  spaces this way.  Medusa was a lot of fun to paint for sure.  
I also tried the really drastic NMM on the sword that a lot of people have been doing to their GW models, and I feel like it looks like crap in real life but looks great in pictures. It's kinda odd that way.  I'm sure I could have pushed the highlights further than I did but I just wasn't feeling "it".
The base is a cheapie I picked up at my local game shop I can't remember what company puts it out. I'll have to check next time i'm there if anyone is interested.

Anyways I off and I hope you enjoy Artemis as much as I do.


Friday, August 10, 2012

Artemis - Work in Progress

It's been a while since I've actually posted a work in progress update.  Here is one of the many version of Artemis by Hasslefree miniatures.  I'm painting this girl up for WAMP's HF painting contest.  There is still plenty of time to paint a miniature if you want to enter as well.
So far i've mainly just worked on her skin tone and had just finished added some purples, reds, and pinks to her skin.   Since these pictures I've started in on the NMM pieces so I can come back to the skin later and do touch ups.  I plan on painting a picture onto her shield as it's a large blank canvas and needs something awesome to fill up that space. Also I've already got her base chosen and ready to be painted as well.  Of course you will have to wait for the finished piece to see it.


Thursday, July 26, 2012

The Baby Sitter ... or was it Butcher?

Now this is a bit of a funny story, well it's funny / cute to me.  
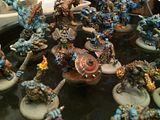
I've had the Butcher from KD sitting on my desk waiting for inspiration to hit and my boyfriend says to  me "wouldn't it be cool if he was a baby sitter?" implying he would watch demon babies for his friends but never set down his knives, and of course I can see it in my head and the ideas start flowing.  Originally this idea was for another friend but she hasn't picked up her miniatures in a year or more now, so I claimed it as mine and went to work. Of course it took a while to get together the demon babies and playroom goodies.  I was honestly surprised I could find baby room miniature bits. I didn't even use them all.  But Wyrd came through and I ended up using the blocks, rocking horse and magic mirror.  
I thought it would be fun to have them sitting on top of a toy box as a base and picked up one of those little wooden ones from the craft store gave it a good sanding and primed it black. The walls are styrene  because I really didn't want to mess with anything more difficult. In the magic mirror i tried to paint the mirror from sleeping beauty but it didn't turn out as nice as I wanted.  I still like it though. 
Now I don't know how the clowns happened but I think it's because I wanted to paint something festive on the box, just like a normal toy box. They usually have pictures of trains, ballons, clowns and other fun things.  Since this is a demon toy box I went for the scary clown first - Penny wise, and originally there were going to be ballons on the other side but they were just kind of flat. So I painted over them and started in on another clown - Bozo.  I'll apologize to all the clown fearing people out there in advance.   And of course the box says Toys on the front, can't you read it? It's plain as day. ;)
I know most of you are going to say WTF??? when you see this. But that's ok I would probably say the same thing.