Thursday, November 3, 2011

Suicide Queen and Rollo

New mini is finished! Suicide Queen and Rollo by Soda Pop miniatures.
Now I don't know what I was thinking going from 54mm to a tiny 30mm  I know Soda Pop Minis are smaller than average and I should have known better.  Looking at my photos i'm mad about all the stuff I messed up and the paint that chipped when I put her on the base.  I also had major problems at the end taking Rollo off his peg and smashing 2 out of 4 feet with complete removal of one of them. So I had to sculpt some new ones and hope for the best.   Maybe I should rename him Stumpy.
Overall i'm pretty happy with her as she looks great in person. I'm also looking forward to the rules for Relic Knights to come out, as it stands I should have enough painted minis to play already.

I've just added her over at CMON and she needs a little love.  I always find the ratings on cmon interesting especially when I compare it to other ratings.  I find it very interesting that my Soda Pop minis get lower ratings than my other minis with one exception.  It makes me examine what a high rated mini looks like and what mine is missing from that example.


Monday, October 17, 2011

What big teeth you have grandma....

I've been holding onto these pictures for a while. I actually started them then decided to enter them into a contest on the WAMP forum where judging starts at the first of next month.
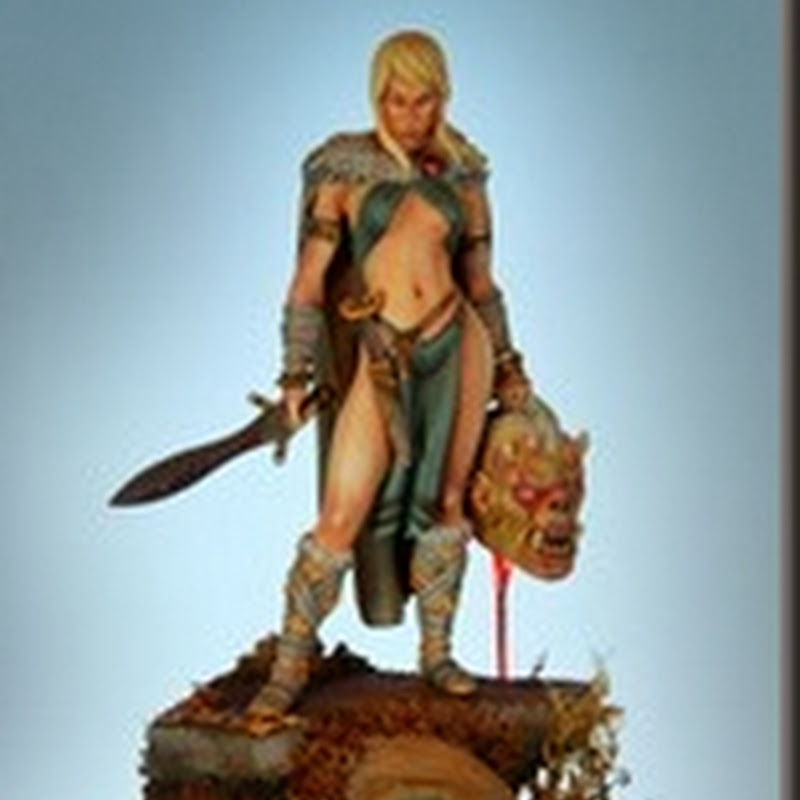
So Red Riding Hood is Kingdom Deaths 54mm Twilight Knight and the Wolf is Privateer Press's Warp Wolf Extreme (which my boyfriend designed and sculpted).  The warp wolf is the same one I started painting brown last year and put up on a shelf because I wasn't happy with how it was coming out.  So it got a simple green bath and since simple green kills green stuff i also had to refill all the gaps.
His skin tone was painted using many shades of blues, blacks and purples and his fur was done with blacks and reddish browns.  I really enjoyed painting his skin as it seemed much easier this time than it did before. A year of practice really made a difference for sure.
Red Riding Hood was my first practice subject for painting metallic paints (before Sebastian a few posts back). I really enjoyed experimenting with the browns, red, purples and blues on the silvers.
I trimmed down her cape because I really wanted her butt to show I know i'm a perv but seriously this miniature has a great ass. The body shape of the KD figures really reminds me of go go dancers from the 60s. Anyways I also added a few holes into the cape and trimmed down how thick the cape was in the shoulders and on the inside length of it.
The base is one of those cheep wooden plaques you can get at the craft stores for a buck.  The end where the tree trunk meets the base was hollowed out and then the tree was pinned to the wood and covered with magic sculpt to make sure it wouldn't pop out at any time.  Jason's Dremel really got a work out. Roots were sculpted with Fimo and the rock is well a rock from the front yard.  Fluffy green flock was used for the forrest floor and tiny dried flowers and moss were added.  The mushroom on the tree I sculpted and the magic mushroom on the ground Jason sculpted for me. They were actually demos for me so I would know how to sculpt them of course his demos are going to be better than any I can put together the first time around.
Lastly the wood base was painted last and then covered in 2 layers of dark wood varnish - voila she is done!
*Updated with new images*


*Edit : Butt Shot added per request! 


Saturday, October 8, 2011

I call him Zorak

A couple more baby dragon WIP shots.
The blue one I call Zorak as his eyes were inspired by a suspicious Zorak from Cartoon Planet. 


Wednesday, October 5, 2011

WIP - Baby Dragon from Super Dungeon Explore

I'm working on something totally adorable!  I know some people have already seen them at or in pictures from Gen Con and PAX.... Here is the first of 4 baby dragons that will be available in Super Dungeon Explore  as far as I know you won't be able to get them anywhere else.  Once you see them in person you will want to paint them all.  [pimping]So seriously pre-order your copy today! [/pimping] ;)

But my little dragons won't be used in the board game, I'm working up a special scene for them on a scenic base.  I'm also planning on painting them all different colors because well I can!  I also plan on testing out some water effects that Jason bought for me from Japan.
Here is a preview WIP shot of my baby green dragon I still need to play around with his freckles, toes and eyes a bit.


Tuesday, September 6, 2011

Soda Pop - Sebastian Cross and Rook

Well I think I finished this bad boy in record time and let me tell you that is no easy feat! Sebastian is HUGE compared to the other soda pop miniatures i've painted.

So my boyfriend encouraged me to try to paint something with metallic paints. Now this is a big deal since i've been shying away from metallics since i've started playing around with NMM painting.  Just recently Miniature Mentor came out with a metallic painting tutorial and it was fabulous and helped push me in the direction with metallics I would be happy with and enjoy painting.  It was basically painting the same way I would with regular opaque paints and adding washes to enhance the colors and shading.
I had to take the miniature on one limb at a time due to the hugeness of him, which seemed to work out well.
I used all Vallejo paints both game and model colors combined and made washes out of the opaque paints I thought would work well.  I use PP mixing medium to make washes and while blending to prevent spot marks/rings and to release the surface tension of the paint so I don't have to press as hard when painting.
I used smokey ink for the browns, and a dark purple mixed with a dark silver for the shading.  For the highlights I used a light blue mixed in with a super light silver.  I avoided using any white to avoid making the metals look pastel.
As for the Gold I used 3 different golds and smokey ink as well as a bit of green to get the right look.

Little Rook was my testing grounds for the colors and you can see that I used some whites in with the silver to highlight and I think it worked fine on something as small as him but I didn't want to put it on the large mech.
I also experimented with glowing objects and I'm not sure i've got it yet i think i need to look at some more references and practice a bit more but I'll get there.
The base detail I sculpted right on top of the base he came with. I wanted to give it a tiled court yard feel so that the impression that he is protecting a sacred place.

Overall I'm pretty happy with the way he came out.