Showing posts with label tutorial. Show all posts

Saturday, February 23, 2013

Action figure 1/18 scale face repaint tutorial

I've been asked to do a tutorial on how I repaint faces on 1/18 scale action figures.  So here it is!

What you might need:
Soft Color Pastels, Soft Color Pencils such as Prismacolor,  Acrylic Paints, Matte Medium, Flow Release.  Paint Brushes cheep and good. Pencil Sharpener, Gummy Erasers and Dust Free Eraser,
Not pictured Mr Super Clear Flat Spray Sealer,   Nail Polish Remover, cotton swabs, Alcohol and other basic craft supplies


Now onto the fun stuff
First Remove the existing paint if you can, I've been using acetone but it can melt soft plastic very quickly.
Then add a coat of Mr Super Clear Flat to your dry clean head. This will give something for the pastel  pigments to stick to.
Then using a Deerfoot brush  (I used a $3 Deerfoot 1/8 artist loft brush from Michaels craft for almost all of this)
Pastels I use are a $15 set of Artist Loft Portrait pastels form Michaels as well.
since my camera washed out all the work I did here is what it looks like with photoshop magic.
Start with the lightest color a bit darker than the skin tone and start shading where the natural shadows would fall. If you aren't sure hold your figure under your desk lamp and take note at where the shadows are.
Then with either the same color or darker color add more pigment to where you want more shadow to fall.
If you find yourself unable to add more color you can always add another coat of Mr Super Clear and then go from there.  This will seal in your work and allow you to add more color.
You can also apply the same technique to the highlights.  adding a little highlight to cheeks or brows can really make the shadow deepen with out adding more shadows. 
I also added a hint of dark orange to his skin tone to give it more depth. 


You can see here in this picture what the shadows look like on the temples and below the apples of his cheeks.  Also don't forget to shade the eyes and crease of the lips.

 I originally painted his beard and stash with paint and decided that I did not like it. I was able to remove it with alcohol and qtips. It took a little work but was worth it.
His eye brows follow his brow ridge which is not symmetrical as you can see I think they tried to add "The Rock's" eye brow lift and failed.

It's hard to see in pictures but in real life he has a furrowed brow and shadow on his forehead and above his eyebrows.  I used a short flat brush for this and actually cut the brush down a bit with a blade to gain more control. It allowed me to push the pigment into the creases which gives a controlled deep shadow


His beard and stash are sculpted on so I just followed the pattern.  Again like the image says if you mess up don't worry you can use that gummy eraser to fix it up.

Now for the eye basics. You may end up painting your eyes many times until you are happy with them. It took me about 3 tries to get it where I liked and I still want to change them.


I also ended up adding more shadow below his eyes and on his eye lids to make his eyes pop a bit more.
The Brushes I use for painting are Raphael Kolinsky Red Sable Pointed Round Brushes Sizes 3/0 , 5/0, & 0.  They are expensive but they are amazing quality, since they are natural sable the tips will not curl like synthetic brushes.
Start with the outter pinks of the eye, then add in the white so you can push the whites out as far as you want with out trying to 'dot' in the pink.
This is where the matte medium and flow release really come in handy for the paints.  Get a pallet and mix your paints on it. simple pallet paper will work and a crap brush for mixing.
put a drop of paint on your pallet and then take a bit of it in your brush and mix some water into it on the pallet, I always add matte medium as it thins it down nicely while keeping the paint from being grainy. Now the flow release helps release the surface tension of the paint so you do not have to press your brush very hard if as all onto the surface to release the paint.  (easy eye balls)
Make sure to let your paint dry between layers.
Now add you color Iris. Put the dark color down first then a light color almost to the edges.  this will make your eyes look awesome.  Now add the black pupil and once that is dry (flow release is awesome here) get some white and give a little reflection glow placed on the iris and pupil.
Then add a shadow outline around the eye, this will give it more depth. If you are painting a girl you can turn it into eye lashes.

Here is what the finished product looks like:

Before and After


Saturday, December 26, 2009

*Tutorial* Non-Metal Metallic Armor

Ok Guys and Gals here is my second tutorial, this is how i paint those elusive non-metal metallics. I won't say this is easy or fast because, well it's not. It's time consuming but it can be lot of fun, or you could honestly be throwing your mini across the table halfway through.

Here are the paints we are going to be using today... Warm greys, a crazy green and a few washes.
Scorpy Green, Stonewall Grey, Basalt Grey, Black Grey, Black , White, and Turquoise (not shown)
Badab Black, Asurmen Blue and Skin Wash

As for brushes i'm using mostly a 3/0 round, 5/0 round, a 12/0 round and a 20/0 monogram (which is just a longer bristle round)


So here is how we left off: just a base of Badab Black over the Basalt Grey.
Notice where the darker areas are and what color your miniature is.
Mix your paint at this point, I like using a wet pallet as it gives me more working time with my paints. Mix your Black Grey with your Basalt Grey until you get a color slightly lighter than the current color of your mini. cover 95% of the armor with this while leaving the black wash to show in the creases. Don't worry if it looks funny right now.. ok so this was the easy step.

Now mix a little bit more of the Basalt Grey into your mix and cover less area than you painted before. you want to basically build color steps. at this point you should figure out where your light source is coming from. to make it easy just assume it's above the mini. you can use your painting light to see where the shadows are cast and which areas are brighter than others. Start to mimic this with your paint.


At this point you should mix more of the Basalt Grey into your mixture and you will probably be at 90% of Basalt Grey at this point. (I always like to have a small amount of the darkest color mixed in to keep the hue of the paint consistent.) highlight even less areas while using your desk light as a reference. As you can see by the picture above there isn't much difference at this point but don't fret it's moving along just fine.


Now add a bit of Stonewall grey and just a dash* of scorpy green into your mixture and highlight the peaks. You can go lighter at this point if you want by mixing up to the stonewall grey but you don't have to. You could even go as far as white but just painting a few tips with it. it's all up to you.
* by Dash i mean a very very tiny amount just to give your grey a green hue.


Now it's time to dirty this girl up!

Bring out your Skin Wash and water it down a bit and apply to the areas you would like to dirty up a bit. i've added it to the flamer front, the funky cables around her neck and on the back of the gun and the fuel pot on her back.

Now here is the trick to really make your NMM pop. Mix together some Black Grey and Turquoise paint. I also like to add some P3 mixing medium to it to avoid wash rings. Get it nice and dark with a hint of the turquoise. then just like a wash make sure your paint it thin but not too thin. and start adding it to the areas you want shaded. Around the rivits, between the fingers, in the creases, any and everywhere you want. I also put a couple coats of it on the top of the skin wash on the gun. I use this mix to blend the darker greys together. In the darker areas feel free to do more than one coat of this.

This wash usually helps blend in the darker areas so that your lighter areas really pop. Also in this pic I added a coat of Asurmen Blue to the end of the flamer to simulate a scorched weapon. you can also add a bit of black wash to really darken it up.
Also to help sharpen up your paint job, use the 20/0 brush and line the creases with a watered down black mix. After all it's not how well you paint, it's how well you do touch ups!

Here is a side by side view of each step. I hope that helped...


Sunday, December 6, 2009

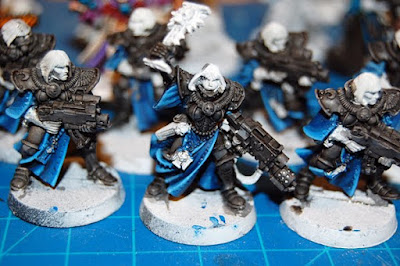
*Tutorial* How I paint Sisters part 1

Ok first off I was going to put this all in one post but i figured i would break it up into segments since these SoBs take me so long to paint.

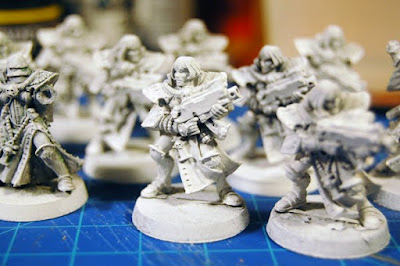
Of course first clean, file off all the mold lines, and drill out the gun barrels. If you miss any mold lines they will show up when you prime your model and should be easy pickins after that.

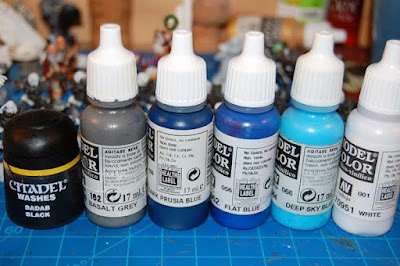
Here are the paints i'm using for this post:

I chose white primer because it's easier for me to see all the details. I use krylon primer, it's cheap (about $5 a can) and works great. These models are a bit harsh as they had been painted before and recently had a bath in simple green.


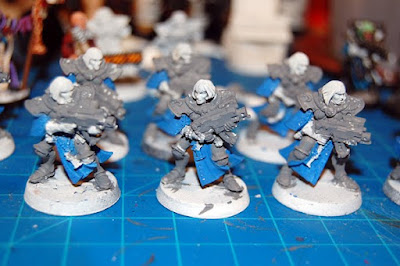
First I used a flat brush with a rounded tip to block out the areas i want to paint. I tend to do the whole squad at once. Basalt grey first then flat blue. I try to be good and color within the lines but it doesn't always work. no biggie. Nothing a little paint can't fix later on.


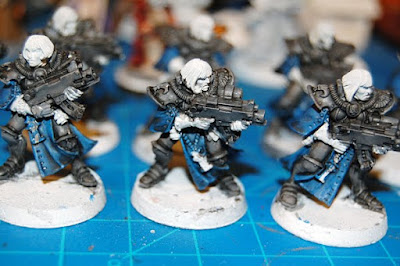
Then it's time for the black wash. I like to black wash the whole thing to give me an idea as to where the shadows are going to lay. No skimping on the wash, i added a second layer into the creases of the armor for later. Granted this could be seen as a waste of good wash. but i find that it helps with the process.
Now it's time to paint the blue, using a size 0 round brush I start off with with Dark prusia blue as seen above and water it down and add some mixing medium to it.

I cover all the blue quickly so the paint is still wet when i add the next color.

I add a little flat blue to the dark blue and lighten it a step up then apply it to the hills of the robes and make sure to leave the valleys the darker blue to imply shadow.

I continue mixing up to almost flat blue but i make sure to leave a little of the dark blue mixed in. (Switch to a 3/0 round brush) Then I mix in a bit of the Deep sky blue to lighten it and continue to paint the hills on the robes while painting less and less area each time.

For the final coat i add a little bit of white to the mix just to make it pop but not over powering.

All of the layers are watered heavily but not so much they get splochy. I guess to about the consistency of 1% milk.
Granted you probably don't need to do all that layering to get the same effect but it does stand out from over 12 inches away.

After i finish i check over the mini and make sure the steps blend in enough for my tastes if they don't, i take a really watered down Dark blue wash and add a layer or two over those specific areas till it looks ok to me. You could also do this step and the first blue step with a GW blue wash as it's about the same color.

At this point I don't bother with the super fine details like the weird rivets on the robes as i save those for the 'touch up' session when everything else is done and I have out my 20/0 paint brush for the finer points.

Let me know if you have any questions or if i'm out of my mind.