
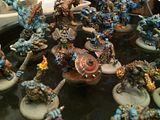
Of course first clean, file off all the mold lines, and drill out the gun barrels. If you miss any mold lines they will show up when you prime your model and should be easy pickins after that.
Here are the paints i'm using for this post:

I chose white primer because it's easier for me to see all the details. I use krylon primer, it's cheap (about $5 a can) and works great. These models are a bit harsh as they had been painted before and recently had a bath in simple green.

First I used a flat brush with a rounded tip to block out the areas i want to paint. I tend to do the whole squad at once. Basalt grey first then flat blue. I try to be good and color within the lines but it doesn't always work. no biggie. Nothing a little paint can't fix later on.

Then it's time for the black wash. I like to black wash the whole thing to give me an idea as to where the shadows are going to lay. No skimping on the wash, i added a second layer into the creases of the armor for later. Granted this could be seen as a waste of good wash. but i find that it helps with the process.
 Now it's time to paint the blue, using a size 0 round brush I start off with with Dark prusia blue as seen above and water it down and add some mixing medium to it.
I cover all the blue quickly so the paint is still wet when i add the next color.
I add a little flat blue to the dark blue and lighten it a step up then apply it to the hills of the robes and make sure to leave the valleys the darker blue to imply shadow.
I continue mixing up to almost flat blue but i make sure to leave a little of the dark blue mixed in. (Switch to a 3/0 round brush) Then I mix in a bit of the Deep sky blue to lighten it and continue to paint the hills on the robes while painting less and less area each time.
For the final coat i add a little bit of white to the mix just to make it pop but not over powering.
All of the layers are watered heavily but not so much they get splochy. I guess to about the consistency of 1% milk.
Granted you probably don't need to do all that layering to get the same effect but it does stand out from over 12 inches away.
After i finish i check over the mini and make sure the steps blend in enough for my tastes if they don't, i take a really watered down Dark blue wash and add a layer or two over those specific areas till it looks ok to me. You could also do this step and the first blue step with a GW blue wash as it's about the same color.
At this point I don't bother with the super fine details like the weird rivets on the robes as i save those for the 'touch up' session when everything else is done and I have out my 20/0 paint brush for the finer points.
 Let me know if you have any questions or if i'm out of my mind.


.jpeg)


Very vivid blue! Nice look on the sisters.
ReplyDeleteGreat tutorial! The center bit suffered a little from 'wall of text' syndrome, but an extra blank line between paragraphs will take care of that.
ReplyDeleteMy main questions are:
Why use a square brush for blocking in?
and
How do you take care of all the airbubbles on these minis? (In the button-holes, weapons and details.)
I use a flat brush with a rounded tip so it's not square but a soft U Shape. Why because it covers more area than a typical reg round brush. there is nothing special about it.
ReplyDeleteAll t hose little holes i fill with the black wash or a dark wash of what ever color i'm using. I've been trying to find a decent way to make them show up with out being over kill, i haven't found it yet. For now i just paint over it as normal and try not to be heavy handed so my lighter paint doesn't travel into the holes. for the bumps i just highlight those as you would rivets a little dot of high light and a shadow at the bottom.
Oh and i'll see what i can do about breaking up that big paragraph. After i posted it i realize i should have taken pics of each step.
The tutorial is an awesome idea, thanks for posting. Pics of the in between steps would help get a clearer idea of the blending technique you are describing. Its hard to remember to put down the paint brush and pick up the camera when your hot on a project though, so it sometimes can get forgotten.
ReplyDeleteThanks Sammy! Yeah my bad on that one, I'm about halfway through the armor on this squad and am waiting till the last one to take pics so i can work out the kinks.
ReplyDelete